Administrations: Edit Existing
Use the Administration Setup page to modify an existing test administration. From this page, you can update the administration name, review the selected test, and revise testing details before making changes to access settings, student assignments, or other administration configuration options.
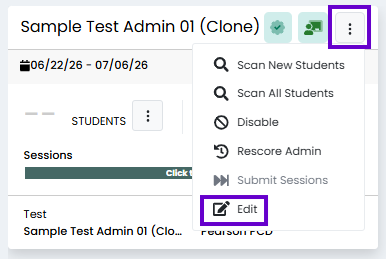
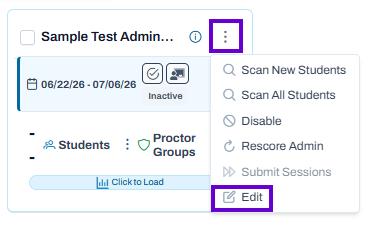
To modify an existing administration, first locate the administration on the Administrations page. Select the More Actions menu (⋮) next to the administration you want to update, then choose Edit.
Open the Administration
- From the Administrations page, select the More Actions menu (⋮) for the desired administration.
- Choose Edit to open the administration setup wizard.
For instructions on how to use and create Administions see also: Administrations
Classic User Interface:
Updated User Interface:
Edit an Existing Administration
Once the Administration Setup page opens, you can review and update the administration's configuration.
Navigating the Setup Wizard
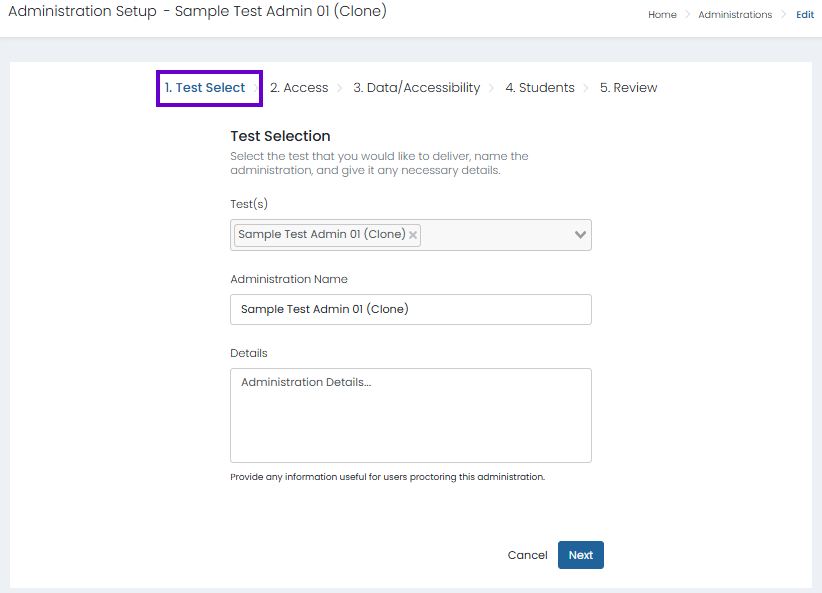
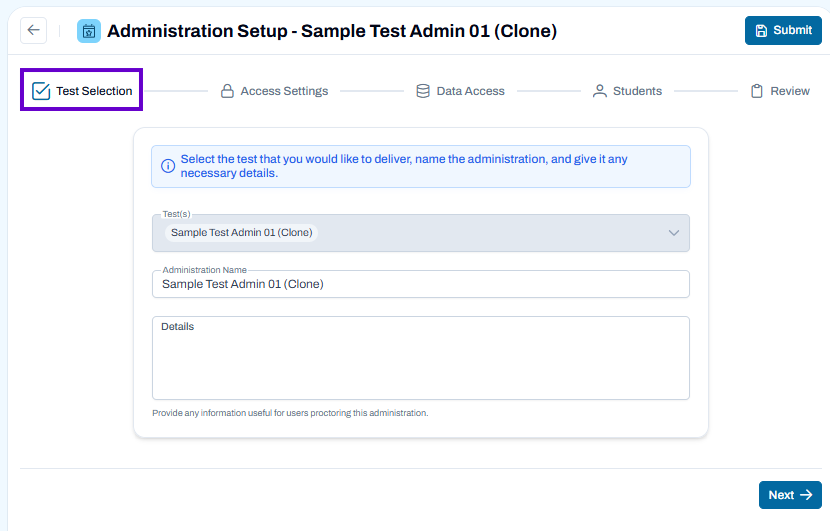
The progress bar at the top of the page displays the remaining configuration steps:
- Test Selection – Review the assessment associated with the administration and update key administration information.
- Access Settings – Review and update testing windows, login methods, and access restrictions.
- Data Access – Manage organization, district, school, or group access.
- Students – Review and update student assignments.
- Review – Verify all settings before saving changes.
Classic User Interface:
Updated User Interface:
Test Selection
The Test Selection step allows you to review the assessment associated with the administration and update key administration information. When editing an existing administration, the selected test may be displayed as read-only, depending on your permissions and system configuration.
Test(s):
- Displays the test associated with the administration.
- If available, use the dropdown to select a different test. In many cases, the test selection is locked after an administration has been created to preserve student assignments, sessions, and reporting relationships.
- Verify that the displayed test is the correct assessment before proceeding to the next step.
Administration Name:
- Specifies the name used to identify the administration throughout the system.
- Update the name to reflect changes to the testing window, school year, subject, grade, or other identifying information.
- Choose a descriptive name that makes it easy for administrators and proctors to locate the administration.
Details:
- Provides additional information about the administration.
- Enter testing instructions, scheduling notes, contact information, accommodation reminders, or other guidance for users managing the administration.
- Information entered here can help coordinators and proctors understand the purpose and requirements of the testing event.
Select Next to continue to the next configuration step, or select a completed step in the navigation bar to return to a previous section and make additional changes.
Best Practices
- Confirm that the correct test is associated with the administration before updating other settings.
- Use consistent administration naming conventions to simplify reporting and administration management.
- Keep the Details field up to date with any important information that proctors or coordinators need during testing.
- Review all subsequent steps after making changes to ensure student assignments and access settings remain accurate.
Access
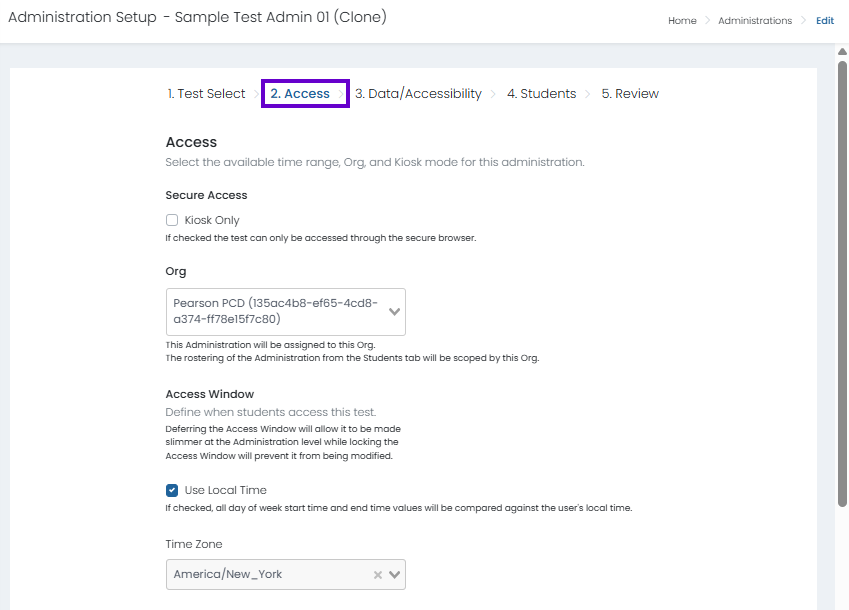
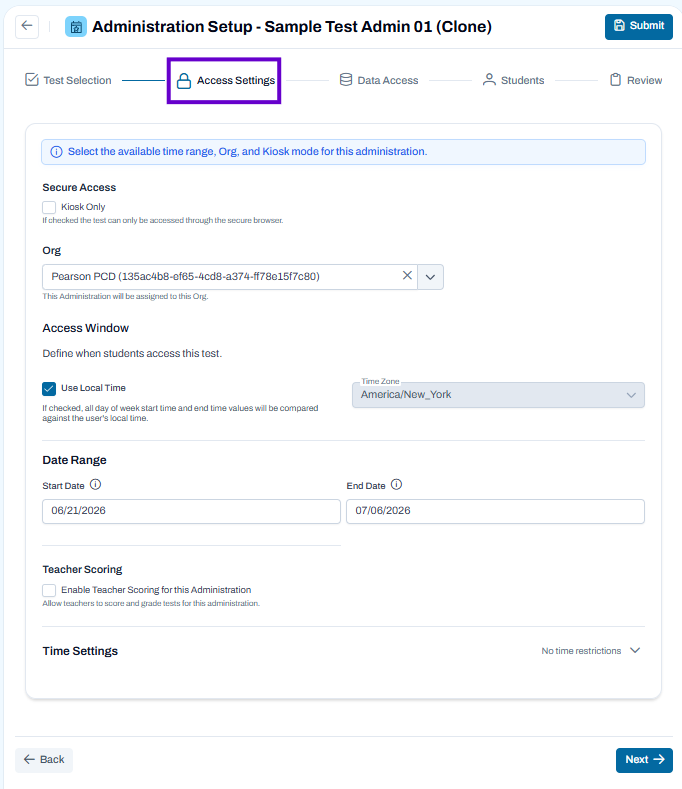
Use the Access Settings page to configure when students can access the test and define any administration-level security or scoring options. Settings configured here apply to all students assigned to the administration.
Classic User Interface:
Updated User Interface:
To configure access settings:
Select Secure Access Options
- Enable Kiosk Only if the test should only be accessed through the secure testing browser.
- Leave this option unselected if students can access the test through supported standard login methods.
Review the Assigned Organization
- The Org field displays the organization associated with the administration.
- Verify that the administration is assigned to the correct organization before continuing.
Configure the Access Window
- Determine when students can access the test by defining the administration's testing window.
- Enable Use Local Time if start and end times should be evaluated based on each user's local time zone.
- Select the appropriate Time Zone if a specific administrative time zone should be used.
Set the Testing Date Range
- Enter a Start Date to specify when the administration becomes available.
- Enter an End Date to determine when access to the administration ends.
- Students can only access the test during the defined date range.
Enable Teacher Scoring (Optional)
- Select Enable Teacher Scoring for this Administration to allow authorized teachers to score eligible test content.
- Leave this option disabled if teacher scoring is not required.
Configure Time Settings
- Use the Time Settings section to define timing rules for the administration.
- Depending on your configuration, you may be able to establish time limits, timing restrictions, or untimed testing conditions.
Continue to the Next Step
- Select Next to proceed to Data Access.
- Select Back to return to the previous step without leaving the setup process.
Best Practices
- Verify the testing window dates before publishing changes to ensure students can access the test at the correct time.
- Use the appropriate time zone when coordinating testing across multiple locations.
- Enable kiosk mode for secure, high-stakes testing environments when required.
- Review timing settings carefully, as changes may affect all students assigned to the administration.
Data / Accessibility
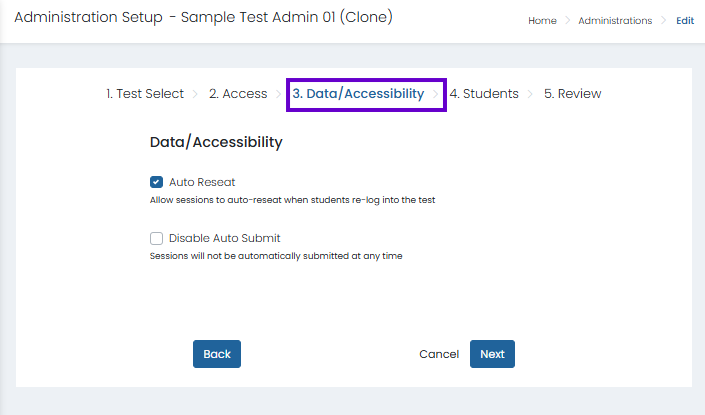
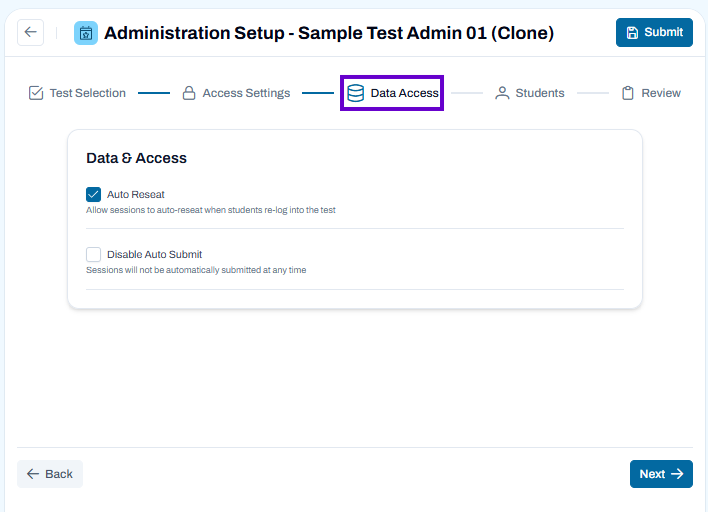
Use the Data/Accessibility page to configure how testing sessions behave when students leave and return to a test, as well as how sessions are submitted. These settings apply to all students assigned to the administration.
Classic User Interface:
Updated User Interface:
To configure data and accessibility settings:
Configure Auto Reseat
- Select Auto Reseat to automatically return students to their testing session when they log back into the test.
- This option helps reduce administrative effort when students are disconnected or need to resume testing after logging out.
Configure Automatic Submission
- Select Disable Auto Submit if student sessions should never be submitted automatically.
- When enabled, sessions will remain open until they are manually submitted by an authorized user.
- Leave this option unselected to allow the system's standard automatic submission behavior.
Review Your Settings
- Verify that the selected options align with your testing policies and administration requirements.
- Consider how session resumption and submission settings may impact test security and administration workflows.
Continue the Setup Process
- Select Next to proceed to the Students step.
- Select Back to return to the previous step.
- Select Cancel to exit without saving additional changes.
Best Practices
- Enable Auto Reseat when students may experience interruptions or need to resume testing across multiple sessions.
- Use Disable Auto Submit only when manual control of session submission is required.
- Review these settings before the testing window begins, as they affect all students within the administration.
- Coordinate with test administrators and proctors to ensure session management procedures align with the selected configuration.
Students
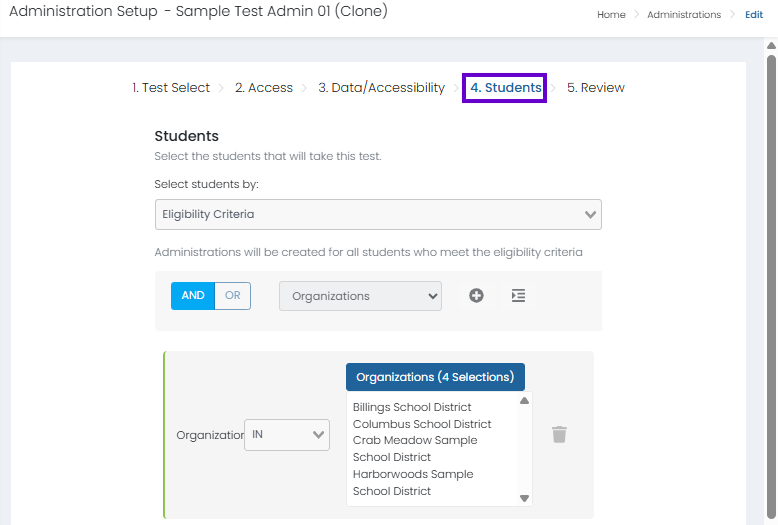
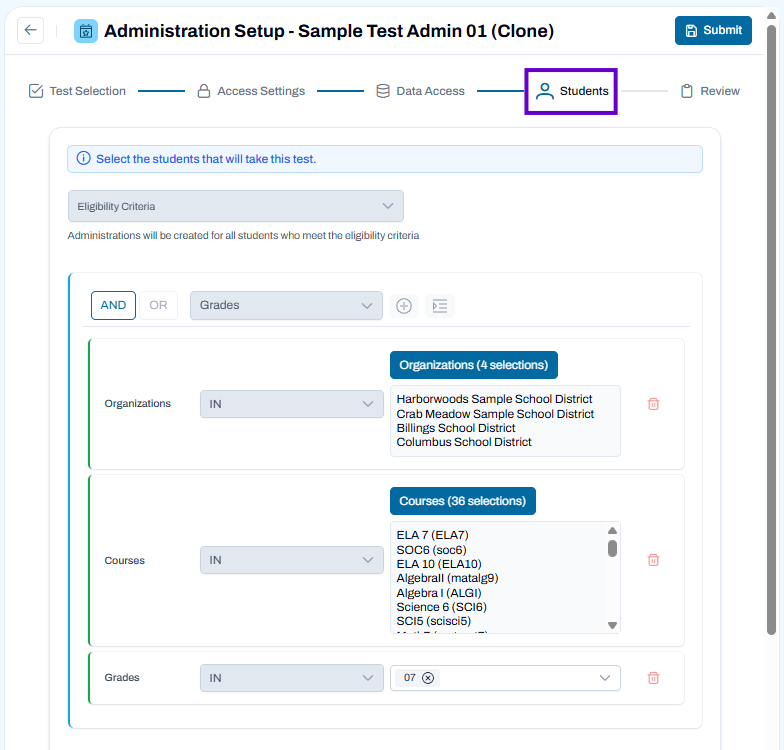
Use the Students page to define which students will be assigned to the administration. Create eligibility criteria based on organizations, courses, grades, and other available attributes to automatically identify students who should receive the test.
Classic User Interface:
Updated User Interface:
To assign students to the administration:
Select Eligibility Criteria
- Use the Eligibility Criteria dropdown to choose how students will be identified for the administration.
- Administrations will be created for all students who meet the selected criteria.
Build Student Filters
- Use the filter controls to define which students should be included.
- Select a criterion type, such as:
- Organizations – Include students from selected districts, schools, or organizations.
- Courses – Include students enrolled in specific courses.
- Grades – Include students in one or more grade levels.
Define Filter Logic
- Use AND to require students to meet all selected criteria.
- Add additional criteria as needed to further refine the student population.
Select Values
- Choose the organizations, courses, grades, or other available values that should be included in the administration.
- Multiple selections can be made within each filter.
Estimate Student Counts
- Select Estimate Counts to preview the number of students who meet the current eligibility criteria.
- Review the estimated student count before proceeding to ensure the correct population has been selected.
Proctoring Options
Disable Proctor Approval
- Enable this option to allow students to continue testing without requiring proctor approval.
Create Default Proctor Groups
- Enable this option to automatically create proctor groups based on school and accommodation assignments.
- Select applicable accommodations if required for your testing workflow.
Review and Continue
- Verify that the estimated student count matches your expectations.
- Review all eligibility filters for accuracy.
- Select Next to proceed to the Review step.
- Select Back to return to the previous page and make additional changes.
Best Practices
- Use multiple criteria to accurately target the intended student population.
- Always run Estimate Counts after modifying eligibility rules.
- Review organization and course selections carefully, especially when working across multiple schools or districts.
- Verify proctoring settings before saving changes, as they may affect student access and test session workflows.
Review
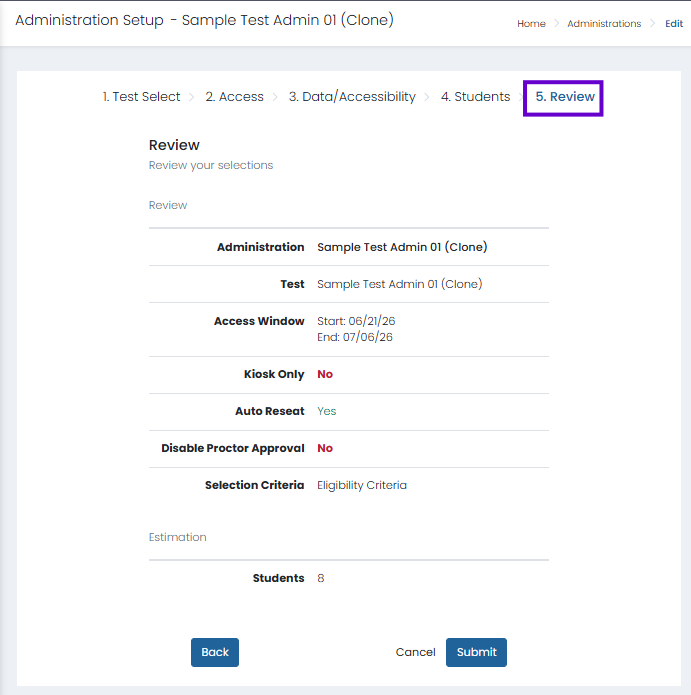
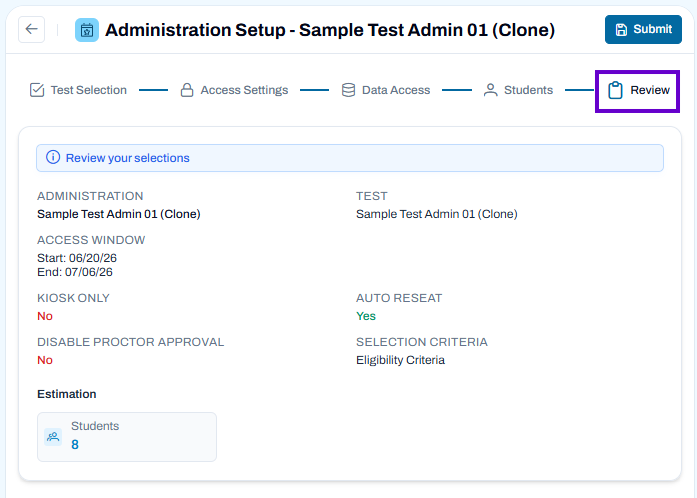
Use the Review page to verify all administration settings before saving your changes. This page provides a summary of the administration configuration, testing window, accessibility settings, and student assignment estimates.
Classic User Interface:
Updated User Interface:
To review and save an administration:
Review Administration Information
- Confirm the Administration name is correct.
- Verify that the correct Test is associated with the administration.
Verify Access Settings
- Review the Access Window start and end dates.
- Confirm whether Kiosk Only access is enabled or disabled.
- Check any additional access settings configured during setup.
Review Accessibility and Proctoring Settings
- Verify the Auto Reseat setting reflects your testing requirements.
- Confirm whether Disable Proctor Approval is enabled or disabled.
Review Student Selection
- Confirm the Selection Criteria used to identify eligible students.
- Verify the estimated Student count matches your expectations.
Make Changes if Needed
- Select Back to return to previous steps and update settings.
- Review each section carefully before submitting, as changes may affect student access and testing sessions.
Save the Administration
- Select Submit to save all changes to the administration.
- Once saved, the updated settings will be applied to the administration.
Best Practices
- Carefully review the student count to ensure the correct population will receive the test.
- Verify testing dates and access settings before submitting changes.
- Confirm accessibility and proctoring settings align with your organization's testing procedures.
- Use the Review page as a final quality check before publishing changes to an active administration.