The Administrations page is used to create, view, and manage test administrations. Administrations define when a test is available, which students are assigned, and which proctor groups are responsible for test delivery.


Classic User Interface:
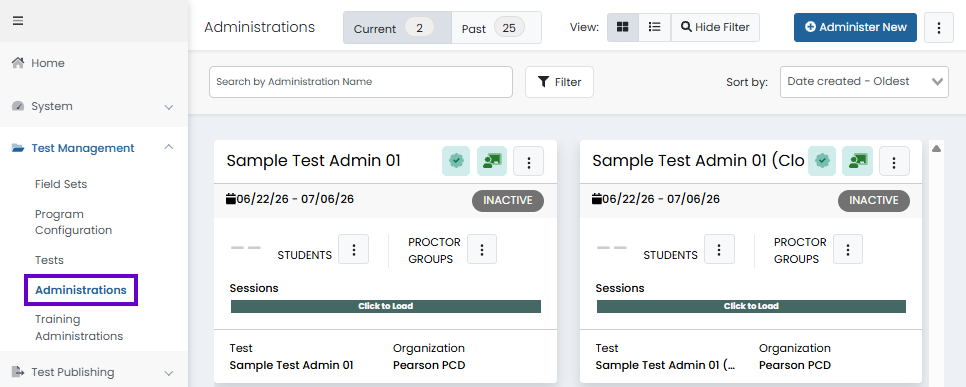
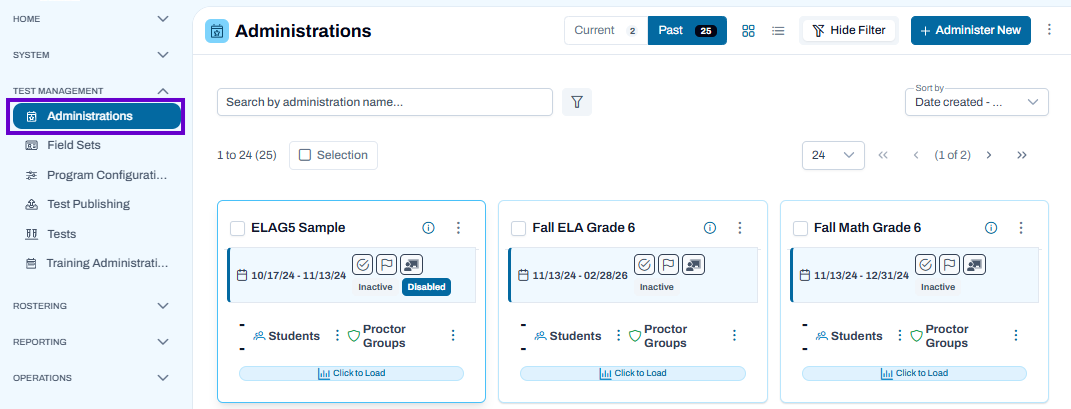
 Administrations page showing current and past test administrations, with search, filters, and administration management options.

Updated User Interface:

Administrations page showing current and past test administrations, with search, filters, and administration management options.

View Administrations

  1. Navigate to Test Management > Administrations.
  2. Use the Current and Past tabs to switch between active and completed administrations. 
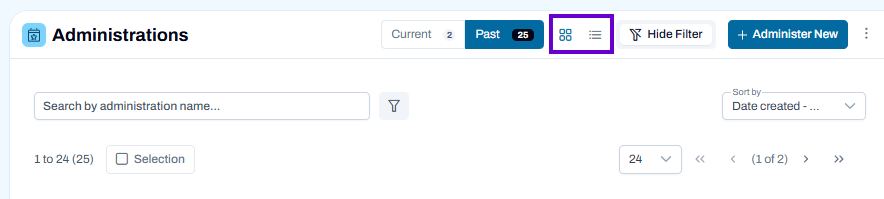
    1. By default the page filters to using Administration Cards as the view. For those that prefer, you have the option to toggle to a List View.
  3. Browse administration cards to view key details, including:
    • Administration name
    • Testing window dates
    • Status (for example, Inactive or Active)
    • Associated test
    • Organization
    • Student assignments
    • Proctor groups

Search and Filter Administrations

  1. Enter a name in the Search by Administration Name field to locate a specific administration.
  2. Select Filter to apply additional search criteria.
    1. Toggle between Show Filter and Hide Filter. Use the Filter button to filter the administration list by program, test, test code, and administration type.
  3. Use the Sort By menu to change how administrations are displayed.

Classic User Interface:

Filter available on the Administration page

Updated User Interface:

Filter available on the Administration page


Manage Students and Proctor Groups

The Students and Proctor Groups sections on each administration card provide quick access to the users and groups associated with that test administration. These tools allow administrators to review assignments, manage participation, and generate testing materials without opening the full administration.

See also: Administrations: Proctor Groups

Classic User Interface:

Administrations page with current administrations displayed and Students actions menu open for viewing, exporting, or printing cards.

Updated User Interface:

Administrations page with current administrations displayed and Students actions menu open for viewing, exporting, or printing cards.

Students

Use the Students menu to manage the students assigned to the administration.

See also: View Students in an Administration or Proctor Group

Available actions may include:

  • View: View the students assigned to the administration. See View Students in an Administration or Proctor Group.
  • Export: Export the list of students in the administration, including student and teacher information, the proctor group, the test code and form.
  • Print Cards: Open the student test card (or "ticket") page. From here, you can arrange and print the student cards. Each card contains the information, such as the Test Code, that the student needs to start the test. See Printing Rosters and Student Test Tickets.

Proctor Groups

Use the Proctor Groups menu to manage the proctor groups responsible for administering the test.

See also: View Students in an Administration or Proctor Group

Available actions may include:

  • View: View the list of proctor groups. 
  • Export: Export the list proctors, including the Test Code and Proctor Password (if enabled).
  • Print Cards: From the popup menu, select the school you want to print cards for. In addition, if enabled, you may open the Proctor Group Creation Login Card page, which allows you to display and print multiple copies. Each card contains the Test Code and Proctor Password. These should only be used if proctors will be creating groups 'on the fly' to generate their own code per testing room. If proctor groups are pre-created, do not use (the proctor codes will be on the roster that is printed with the test codes.) See also:  Proctoring a Test.

Proctor groups are typically used to organize students into testing sessions and assign testing oversight responsibilities to proctors.

Best Practices

  • Review Students assignments before the testing window opens to confirm all eligible students are included.
  • Review Proctor Groups to ensure students are organized appropriately and assigned to the correct testing staff.
  • Use Export options when auditing assignments or sharing information with authorized personnel.
  • Generate testing cards in advance to support a smooth testing experience on administration day.

Create a New Administration

For step-by-step instructions on creating administrations in ADAM, see Create a Test Administration.

Administrations page with Current tab selected and Administer New button available to create a test administration.


Administration Actions

The Actions menu () on an administration card provides administrative tools for managing the administration and its assigned students. These actions are typically used after an administration has been created to refresh assignments, update scoring, control availability, or modify administration settings.

Open the Actions Menu

  1. Locate the administration card you want to manage.
  2. Select the Actions menu () in the upper-right corner of the administration card.
  3. Choose the desired action from the menu.

Classic User Interface:

Administration actions menu open, showing options to scan students, disable, rescore, submit sessions, and edit administration.

Updated User Interface:

 Administration actions menu open, showing options to scan students, disable, rescore, submit sessions, and edit administration.

Scan for New Students

The Scan for New Students confirmation page appears when you choose Scan New Students from an administration's Actions menu. This process reviews roster and accommodation data and updates the administration to reflect any changes that have occurred since the administration was created.

Perform a scan to update the students in the administration to maintain an accurate roster. See the Refresh Students after Adjusting Classes or Adding New Students page.

Scanning automatically happens every 30 minutes. To optimize site performance, rescan a student rather than the entire administration if applicable, and only if needed within the next 30 minutes.

Classic User Interface:

Scan New Students confirmation dialog open, showing roster update summary and Finish Rescan button.

Updated User Interface:

Scan New Students confirmation dialog open, showing roster update summary and Finish Rescan button.

What Happens During a Rescan?

When you run a rescan, the system can:

  1. Add newly rostered students

    • Students who now meet the administration's assignment criteria can be added automatically.
  2. Update accommodations

    • Sessions that have not yet started can be updated to reflect a student's current accommodation settings.
  3. Remove students who are no longer eligible

    • Sessions may be removed if a student is no longer rostered for the administration.
  4. Remove incompatible sessions

    • Sessions may be removed if accommodation settings indicate the student should not receive the test.

A yellow icon indicates a scan was initiated but is not yet complete.

Classic User Interface:

Yellow icon highlighted

Updated User Interface:

Yellow icon highlighted.

Understanding the Summary

Before completing the rescan, the page displays a summary showing the expected impact:

  • Current Proctor Groups and Students – The number of assignments currently in the administration.
  • New Proctor Groups and Students – The projected totals after the rescan completes.

This allows administrators to review the changes before updating the administration.

Complete the Rescan

  1. Review the summary information and projected changes.
  2. Confirm that the updates are expected.
  3. Select Finish Rescan to apply the changes.
  4. Select Cancel to exit without making any updates.

Best Practices

  • Run a rescan after significant roster changes or student enrollments.
  • Review accommodation changes before testing begins.
  • Verify the projected student and proctor group counts before selecting Finish Rescan.
  • Use the warning message as a reminder to confirm whether updates should be made to closed administrations.

Scan All Students

When Scan All Students is selected the Rebalance Administration page is displayed. It is used to synchronize an administration with the latest roster and accommodation data. It reviews student assignments, updates eligible sessions, and removes records that no longer meet the administration's criteria.

This process is commonly used after student enrollments, roster assignments, or accommodation settings have changed.

What Happens During Rebalancing?

When you select Rebalance Administration, the system:

  • Adds newly rostered students who are eligible for the administration.
  • Updates sessions that have not started so assigned forms align with each student's current accommodations.
  • Removes sessions for students who are no longer rostered in the administration.
  • Removes sessions that should no longer be delivered based on a student's updated accommodation settings.

Classic User Interface:

Rebalance Administration confirmation dialog showing roster update summary, closed-window warning, and Rebalance button.

Updated User Interface:

Rebalance Administration confirmation dialog showing roster update summary, closed-window warning, and Rebalance button.

Understanding the Results Summary

Before rebalancing, the page displays a comparison of:

Current

  • Existing number of Proctor Groups
  • Existing number of Students

New

  • Expected number of Proctor Groups
  • Expected number of Students after the rebalance is completed

Review these values carefully to understand how the administration will change before proceeding.

Complete the Rebalance

  1. Review the summary of proposed changes.
  2. Verify that the updated student and proctor group counts are expected.
  3. Select Rebalance Administration to apply the changes.
  4. Select Cancel to exit without making any updates.

Best Practices

  • Rebalance after significant roster or enrollment updates.
  • Run a rebalance when accommodations have changed for assigned students.
  • Review projected student count changes before confirming.
  • Use caution when rebalancing closed administrations, as changes may affect reporting and historical records.
  • Verify assignments after rebalancing to ensure the administration reflects current roster data accurately.

Disable

  • Makes the administration unavailable for testing activities.
  • Use this option when testing has ended or when the administration should no longer be accessible.

Rescore Admin

The Rescore Administration page is a confirmation dialog used to recalculate and replace scores for all students within a test administration. This process is typically used when scoring updates, answer key changes, scoring rule modifications, or result corrections require the administration's scores to be regenerated.

When to Use Rescore Administration

You may need to rescore an administration when:

  • Test scoring rules have been updated.
  • An answer key or scoring configuration has changed.
  • Assessment results need to be recalculated after a correction.
  • Results appear inaccurate and require reprocessing.

Rescore Administration confirmation dialog open, asking to replace all scores and providing a Rescore Admin button.

Updated User Interface:

Rescore Administration confirmation dialog open, asking to replace all scores and providing a Rescore Admin button.

Before Rescoring

  1. Review the administration to ensure rescoring is necessary.
  2. Understand that existing scores for the administration will be replaced with newly calculated scores.
  3. Verify that all required student responses and sessions have been submitted before proceeding.

Complete the Rescore

  1. Open the Actions menu for the administration.
  2. Select Rescore Admin.
  3. Review the confirmation message:
    • "Are you sure you want to replace all scores in this administration?"
  4. Select Rescore Admin to begin the rescoring process.
  5. Select Cancel if you do not want to make any changes.

What Happens After Rescoring?

  • The system recalculates assessment results using the current scoring configuration.
  • Existing scores are replaced with updated results.
  • Reports and score-related data associated with the administration may reflect the recalculated scores once processing is complete.

Best Practices

  • Perform rescoring only when a score recalculation is required.
  • Verify scoring changes before initiating the process.
  • Communicate with stakeholders if rescoring may affect previously reviewed results or reports.
  • Review updated results after rescoring to confirm the expected changes were applied.

Submit Sessions

  • Finalizes sessions associated with the administration.
  • This option may be unavailable until all submission requirements have been met.

Edit

  • Opens the administration configuration page.
  • Update settings such as administration details, dates, assignments, or other available configuration options.

For step-by-step instructions on creating administrations in ADAM, see Administrations: Edit Existing


Print Paper Forms

Print a paper version of the test. This link is available only if permissioned for your role and a PDF form is attached to the test form (there may be multiple PDFs to print for some tests). 


Start Pre-ID Order

Start a pre-ID order for selected students. After initiating the order, it will appear in Orders > Manage Orders. This link is available only if permissioned for your role.


Alerts

The Alerts icon appears if there are issues that need to be resolved for the administration.


Roster Changes

The Roster Change action checks for updates to student rosters and enrollment data since the administration was originally created. It helps ensure the administration reflects the most current student assignments.

When a roster change is processed, the system may:

  • Add newly enrolled or newly eligible students to the administration.
  • Remove students who are no longer rostered or eligible.
  • Update testing sessions to reflect current roster information.
  • Adjust proctor group assignments as needed based on roster changes.

Classic User Interface:

Administration card showing inactive test, roster change action highlighted, and student and proctor group management options.

Updated User Interface:

Administration card showing inactive test, roster change action highlighted, and student and proctor group management options.


Eligibility Criteria Administration

The Eligibility Criteria icon indicates that the administration is populated based on student eligibility criteria, rather than class-based criteria.

For more information, see Create an Administration.

Classic User Interface:

Eligibility criteria icon

Updated User Interface:

Eligibility criteria icon.


Tiny link: https://support.assessment.pearson.com/x/mAAnC