Set Up TestNav on Mac OS X
This page includes expandable text. If you cannot find your topic, click to display expandable text, and then control-F (command-F on Mac) to search the page again.
These ordered steps correspond to sections below or a related setup page. You can click each link to go directly to the corresponding processes.
- Install Java.
- For each browser below, configure Java and enable pop-up windows for TestNav:
- Close apps and stop processes.
- Set up ProctorCache on proctor caching computer(s).
- Run SystemCheck to verify system readiness and capacity.
- Set up response file backups, and set up a secondary save location.
- Run an infrastructure trial using a practice test.
Disable Siri and/or Dictation services before attempting to sign in to TestNav.
If you use computer restoration or imaging software (for example, Deep Freeze), exclude the Pearson directory and the logs directory, as these contain student backup files and logs for troubleshooting.
Set Up Java and Enable Pop-Ups for TestNav
Configure Java and enable pop-ups for TestNav using the following instructions.
Install and Enable Java
You must install and configure Java on each testing computer. Download the latest supported version of Java, and follow the installation instructions.
Allow TestNav Java Applet to Run
The first time you start TestNav and App Check, you must allow the TestNav Java applet to run.
If you do not accept the security certificates, you see an error message. You must close the browser and complete the update before you can use TestNav and App Check.
Click Allow:

The next notification appears to the left of the address bar. Click Allow and Remember:

- Click Firefox > Preferences...
Click Content and select the Block pop-up windows check box. Then, click Exceptions...

Your secure test website should appear in the Site column, and Allow should appear in the Status column.

If you do not see your secure test website in the Site column with an Allow status, type your secure test website in to the Address of website: field, and click Allow.
Click Save Changes.
Safari
If a notification appears asking you whether to trust your secure test website to use Java, click Trust.

To enable pop-up windows for TestNav:
- Click Safari > Preferences...
Click Security, and deselect the Block pop-up windows check box.

Use Java to run TestNav in Unsafe Mode for Safari
TestNav must run in unsafe mode in Safari. After you trust your secure test website to use Java and enable pop-ups for TestNav:
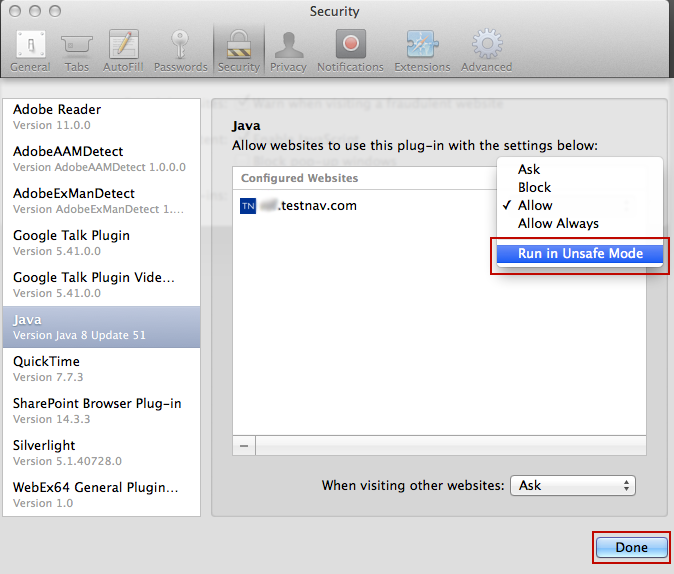
Also under Safari > Preferences..., > Security, click Manage Website Settings... (If the button is disabled, select Allow Plug-ins to enable it.)

- Scroll through the plug-ins on the left side of the window, and click Java. Your secure test website should appear in the Configured Websites field.
Click the drop-down on the right of your website, and select Run in Unsafe Mode. Then, click Done.

When you start TestNav, you may also see one of the following Java notifications depending on which Safari version you use.
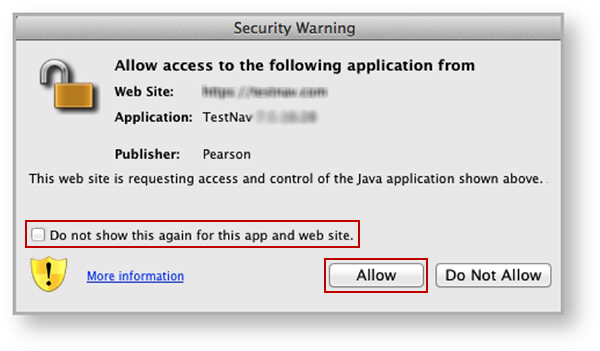
If you see the Security Warning notification:
- Select the Do not show this again for this app and web site check box.
This ensures that the warning screen will not appear again. Click Allow to continue to TestNav and TestNav SystemCheck.

If you see the Do you want to run this application? notification:
- Select the Do not show this again for apps from the publisher and location above check box.
This ensures that the warning screen will not appear again. Click Run to continue to TestNav and TestNav SystemCheck.

Eliminate the Java Prompt When Testing
Complete the following steps for Mac OS X, regardless of which browser you choose:
- Click the Apple icon > System Preferences > Java.
Click Advanced.
Select Enable - hide warning and run with protections:

Disable Java Expiration Check (Recommended)
Oracle automatically checks your Java version with expiration check and may send a notification message to immediately accept Java Critical Patch updates. If a student receives this (or any other notification) during testing, the test administrator must accept the update before the test monitor can resume the student's testing session.
Java does allow you to disable this notification to avoid interruption. To disable expiration check, see Option to disable the “JRE out of date” warning in Oracle’s Update Release Notes.
Close Apps and Stop Processes
Unless disabled, notification messages during student testing may disrupt the TestNav session. This includes the Java notifications described above, as well as notifications from other applications and processes.
TestNav does not permit access to other desktop applications (including applications that may automatically run) without terminating the test.
To minimize potential disruption, you should disable notification messages for common applications:
- Anti-virus software performing automatic updates
- Power management software on laptops warning of low battery levels
- Screen savers
- Email with auto message notification
- Calendar applications with notifications
- Pop-up blockers
Disable Dictionary Add-On and Tracking Protection
You must disable both the Dictionary Add-On and Tracking Protection for testing:
Click the Open Menu at the top-right of the Firefox page, and click Add Ons.

- Click Extensions.
- Find Dictionary Extension, and click Disable.
Click the Open Menu at the top-right of the Firefox page, again, and click Preferences (Options for Windows).
OS X, macOS Sierra

Windows

- Click Privacy.
- Uncheck Request that sites not track you and Use Tracking Protection in Private Windows.
- Restart Firefox and resume the testing session.
Run SystemCheck
- Select your program from the drop-down menu.
- Click Start.
- Click the Check Your System tab, and click Start.
- Passing systems display a green checkmark √ and All Checks Passed at the top of the screen.
- Failing systems display a red x next to the failing component.
- To print the results or save a PDF, click Print Friendly.

After you check your system:
- Click the Testing Capacity tab, and click Start.
- The fields display any proctor caching computers you have designated, test progress, download speed, and estimated testing capacity.
- You can add, edit, or delete proctor caching computers using the instructions for each below.
Remember, if you are using ProctorCache, you must install it and run it on the proctor caching computer before you can check its connection speed and how many testing computers it can handle.
- Click the Testing Capacity tab.
- Click + Add Caching Computer, enter the details, and then click Save.
- Display Name – appears as the computer name in the Server/Computer column
- Host – the IP address of the ProctorCache machine
- Port – the port on which the caching computer is running.
- Click the Testing Capacity tab.
- Click the computer name.
- Edit the host name or port, and then click Save.
- Click the Testing Capacity tab.
- Click the computer you want to delete.
- Click Delete Caching Computer, and then click Continue.
Set Up Response File Backups
TestNav has a default primary SRF save location for all computers and devices. Pearson strongly recommends setting a secondary save location for SRFs as a backup.
- Configure student accounts to have complete read, write, and delete access in these save locations.
- Communicate SRF and log file locations to test proctors.
- Give proctors access to SRF and log files by either of the following:
Grant admin rights to proctors on each testing computer.
Instruct proctors to access these files while the student is logged in to the testing computer.
- (Optional) Configure primary and a secondary save location through your assessment management system.
Default Primary Save Location
| Operating System | SRF Location | Log File Location |
|---|---|---|
| Mac OS X | Users/username/Pearson/Users/username/Pearson/first name-last name-identifier/srf | Users/<username>/Pearson/first name-last name-identifier/logs For example: /Users/UserA/Pearson/User-A-1234/logs |
Pearson strongly recommends that you configure a network drive as a secondary save location to ensure that you do not lose responses, even if a student cannot continue to test on the same computer.
Run an Infrastructure Trial
Pearson strongly recommends running an infrastructure trial to verify the technology setup is complete and to familiarize teachers and students with the test. Use your training site through your assessment management system to complete the trial before the actual test day.
Related Information
You can learn more about SRF and log files on the Browser-based TestNav Setup Overview page.