Users: Edit and View
Typically, the only changes made in rostering is to preferred student name, student accommodations and test assignments, if used. Some customers may create or edit some users within ADAM.
- Go to Rostering > Users.
- From here, you can:
- Click Create New to add a new user. You can only create users in your organization and child organizations, depending on your role authority.
- Click the Edit icon for a user to make changes.
Complete or update each of the relevant tabs.
Click Save after making changes.
Information
- Basic Information
- Given Name (Required), Middle Name, and Last Name (Required)
- Preferred Name, see Preferred Names in ADAM.
- Identifiers & Role
- Identifier (Required): The user ID from the state, district, or school.
- Role (Required): Select a user role, such as Teacher or Student.
- Sourced ID (Required): Enter the user's ADAM identifier.
- Grades (Required): For users in Student and Teacher roles. Select the user's grade(s).
- Generated Codes
- Access Code: This code is automatically generated when the user is created.
- Orgs
- Schools (Required): Select the user's districts or schools. This and other menus typically default to 25 entries; start typing in an org name to filter the list and select your org.
- Contact & Authentication
- Email: Optional. Users with listed email addresses can receive welcome and password reset emails.
- Username: Required for non-student users and students who sign in to ADAM. Enter a username. Not needed for users who do not need to sign in to ADAM.
- User Enabled: Required for active users. You must select this checkbox for users to sign in to ADAM. Note that you can also enable or disable multiple users from the User Config search page.
- Change Password: Enter and confirm a password OR leave blank if you have entered the user's email. The user sets their password from the welcome email.
See also: Users: Student Mobility Considerations
Accommodations
The Accommodations page appears only for student records (for users with the appropriate permissions). Accommodation options that appear (and their names) depend on your system's client settings. Some customers set up accommodation profiles per subject, enabling a student to receive text to speech for math and science but not ELA, for example.
Updated User Interface:
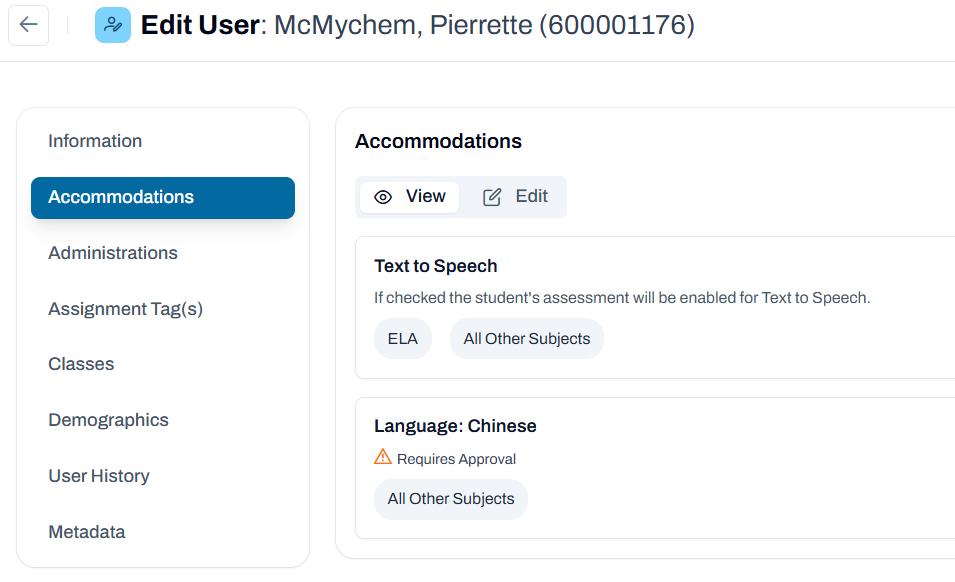
View Accommodations
- Navigate to Users and select the user you want to review.
- Open the Accommodations section from the navigation panel.
- Review the list of accommodations currently assigned to the user.
- Each accommodation displays its name and the subject areas where it will be applied.
- Status indicators may appear for accommodations that require additional review or approval.
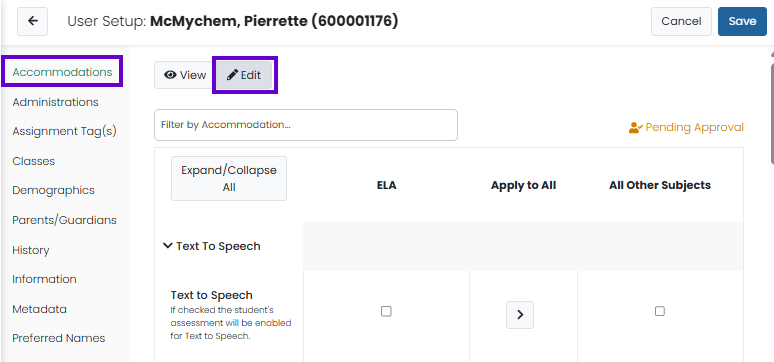
Edit Accommodations
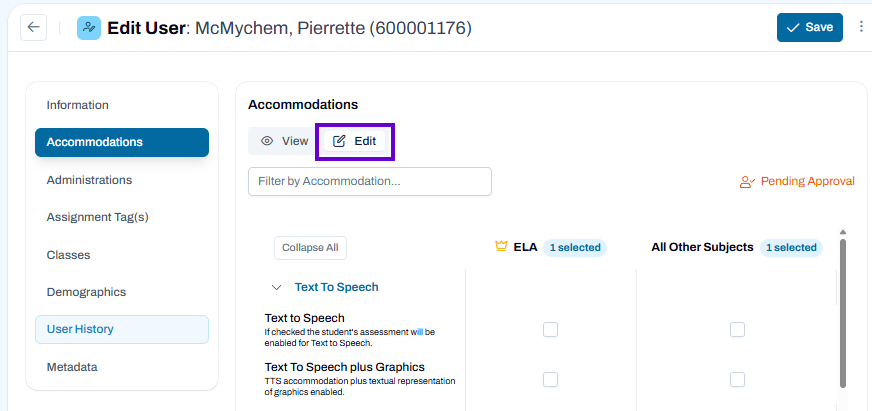
- Select Edit to modify the user's accommodations.
- Add new accommodations or remove accommodations that are no longer required.
- Configure any available accommodation settings, subject assignments, or testing conditions as needed.
- Review the changes to confirm they are correct.
- Select Save to apply the updates to the user's record.
Classic User Interface:
Updated User Interface:
Accommodation Statuses
- Active Accommodations are available for use during applicable assessments.
- Pending Approval indicates the accommodation has been requested but must be reviewed and approved before it can be used.
Related Information
Best Practices
- Verify accommodations match official student documentation and testing requirements.
- Review accommodation assignments regularly to ensure they remain accurate.
- Confirm any accommodations requiring approval are approved before testing begins.
- Further information on available accommodations setup can be found on the following page: Client Settings: Accommodation Groups
Administrations
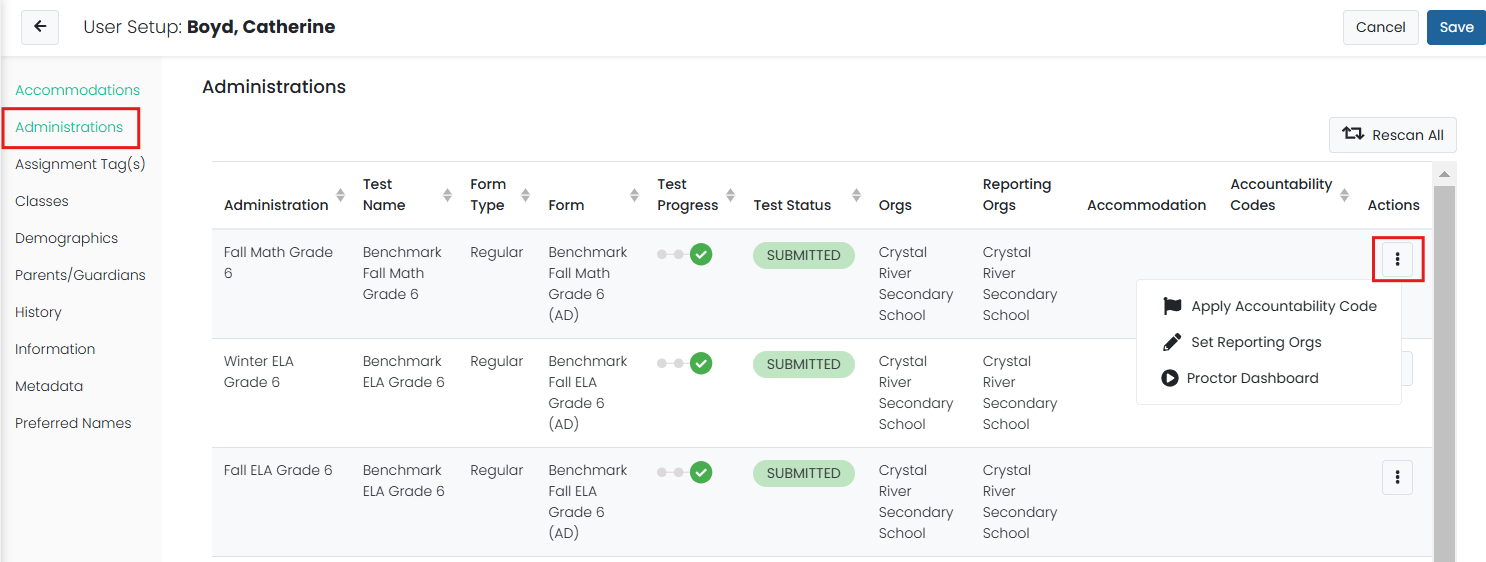
The Administrations tab shows a list of historic and active administrations the student took.
NOTE: This tab appears only for users with the appropriate role permissions. Available option in the Actions menu will vary.
Classic User Interface:
Updated User Interface:
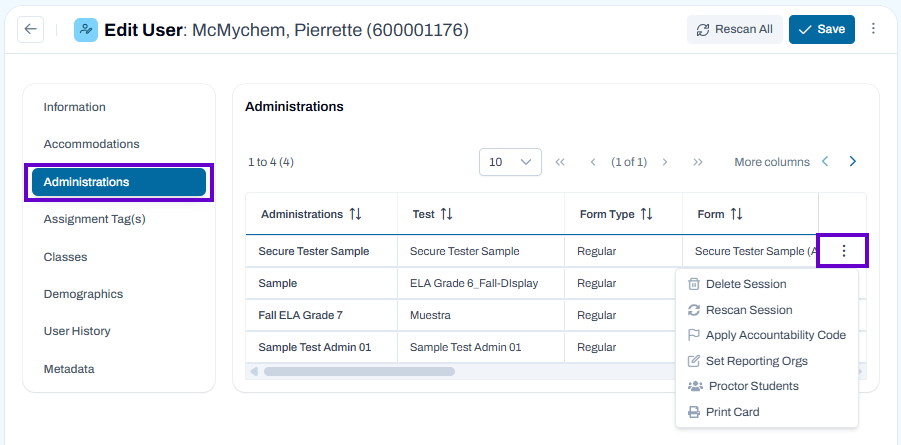
View Assigned Administrations
- Navigate to Users and select the desired user.
- Open the Administrations section from the navigation menu.
- Review the list of administrations assigned to the user, including the administration name, test, form type, and form.
- Use column sorting, filtering, and pagination controls to locate specific records.
Manage an Administration
- Locate the administration you want to manage.
- Select the Actions menu (⋮) next to the administration.
- Choose one of the available actions:
- Delete Session – Remove the user's session from the administration.
- Rescan Session – Refresh and update session information.
- Apply Accountability Code – Assign or update accountability information for the user.
- Set Reporting Orgs – Specify the organizations used for reporting purposes.
- Proctor Students – Open proctoring tools for the selected administration.
- Print Card – Generate and print the user's testing card.
Rescan Administrations
Select Rescan All to refresh administration data and ensure the most current information is displayed.
Save Changes
After making updates, select Save to apply and retain your changes.
Assignment Tags
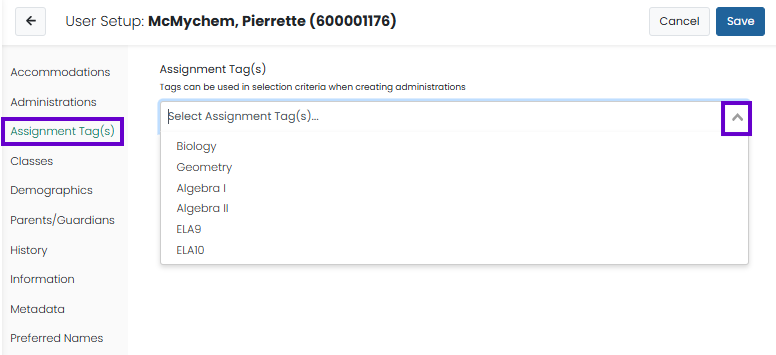
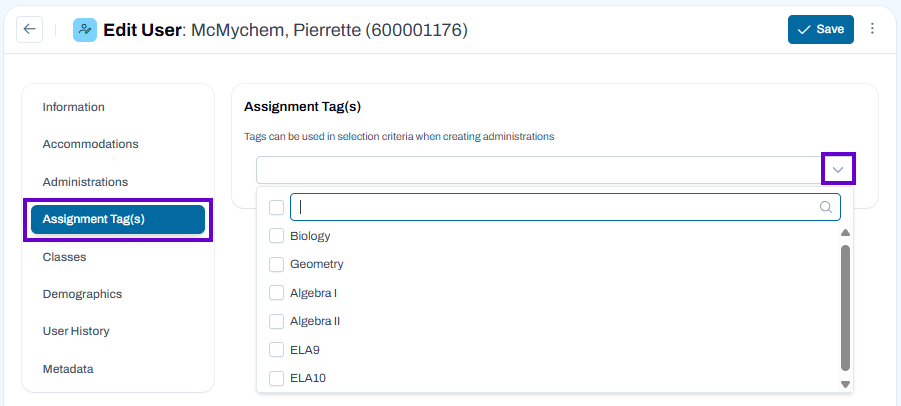
The Assignment Tag(s) page is used to assign tags to a user. These tags can then be used as selection criteria when creating test administrations, making it easier to assign assessments to specific groups of users.
Classic User Interface:
Updated User Interface:
Assign Tags
- Navigate to Users and select the user you want to update.
- Open the Assignment Tag(s) section from the navigation menu.
- Select the tag dropdown field.
- Choose one or more assignment tags to associate with the user.
- Verify that the selected tags are correct.
Save Changes
- Select Save to apply the tag assignments to the user's record.
- The assigned tags can now be used when filtering or selecting users during administration creation.
Best Practices
- Use assignment tags consistently across users to simplify administration setup.
- Review tags periodically to ensure they accurately reflect the user's current testing group or eligibility criteria.
- Remove outdated tags to prevent unintended administration assignments.
Classes (Updated Interface Only)
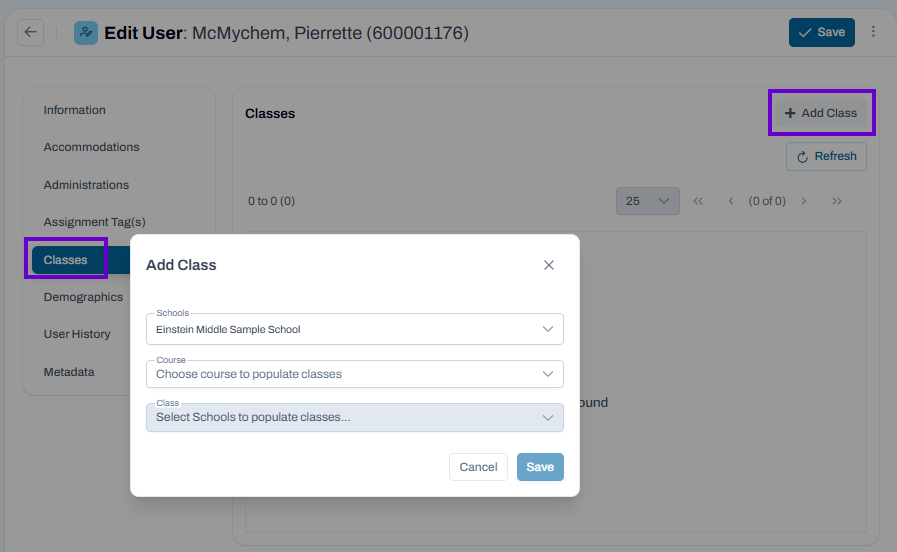
The Classes page is used to view and manage the classes assigned to a user. Users can be associated with one or more classes to support roster management, reporting, and test administration activities.
Updated User Interface:
Add a Class
- Navigate to Users and select the desired user.
- Open the Classes section from the navigation menu.
- Select Add Class.
- In the School field, select the school that contains the class.
- In the Course field, select a course to load available classes.
- In the Class field, select the class you want to assign to the user.
- Select Save to add the class assignment.
View Class Assignments
- Assigned classes are displayed in the classes table.
- Use the page controls to navigate through multiple class assignments.
- Select Refresh to update the list and display the latest class information.
Remove or Update a Class Assignment
- Locate the class assignment in the table.
- Use any available row actions to modify or remove the assignment as needed.
- Save your changes to update the user's record.
Best Practices
- Verify the correct school and course are selected before assigning a class.
- Ensure users are assigned only to classes in which they should participate.
- Review class assignments regularly to keep roster information accurate and up to date.
Demographics
The Demographics page is used to view and manage demographic, educational, and program information associated with a user. This information may be used for reporting, accountability, accommodations, and assessment administration purposes.
NOTE: The Demographics tab appears only for student records (for users with the appropriate permissions). Only the demographics used in your system will appear.
Classic User Interface:
Updated User Interface:
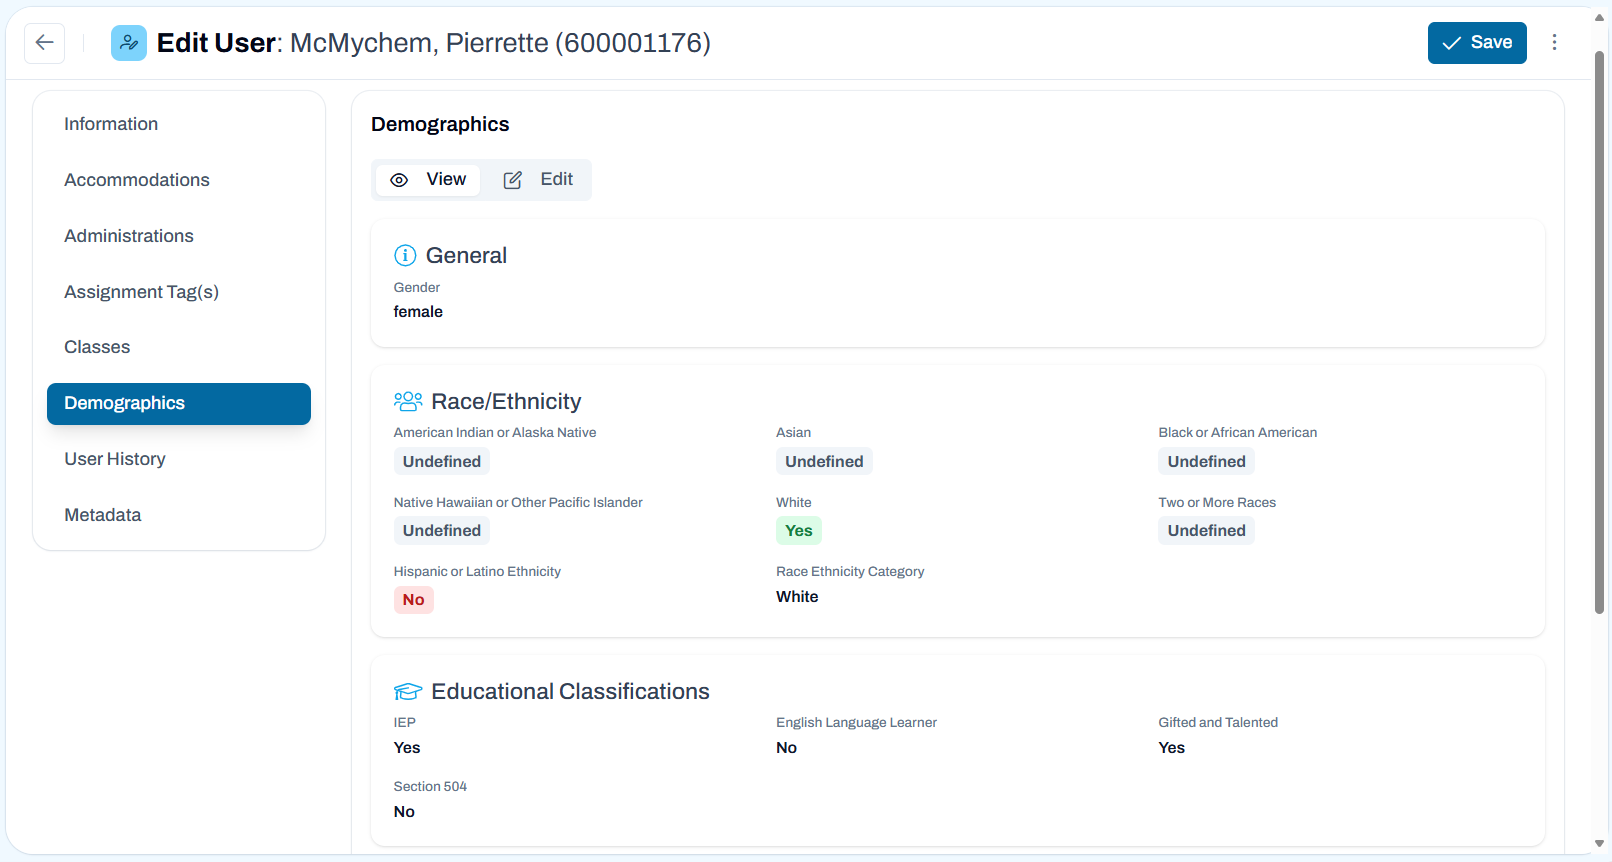
View Demographic Information
- Navigate to Users and select the desired user.
- Open the Demographics section from the navigation menu.
- Review the demographic information organized into categories, such as:
- General – Basic demographic details.
- Race/Ethnicity – Race and ethnicity classifications.
- Educational Classifications – Program participation and educational status.
- Family Economic Status – Economic and family status indicators.
- Other – Additional demographic fields configured for your organization.
Edit Demographic Information
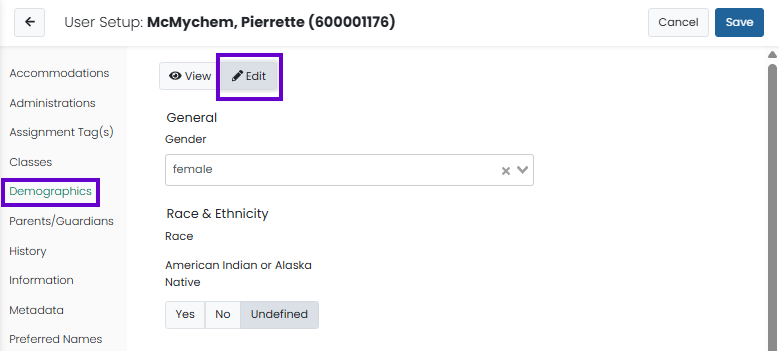
- Select Edit to update demographic information.
- Modify the available fields as needed.
- Verify that all information is accurate and complete.
- Select Save to apply your changes.
Classic User Interface:
Updated User Interface:
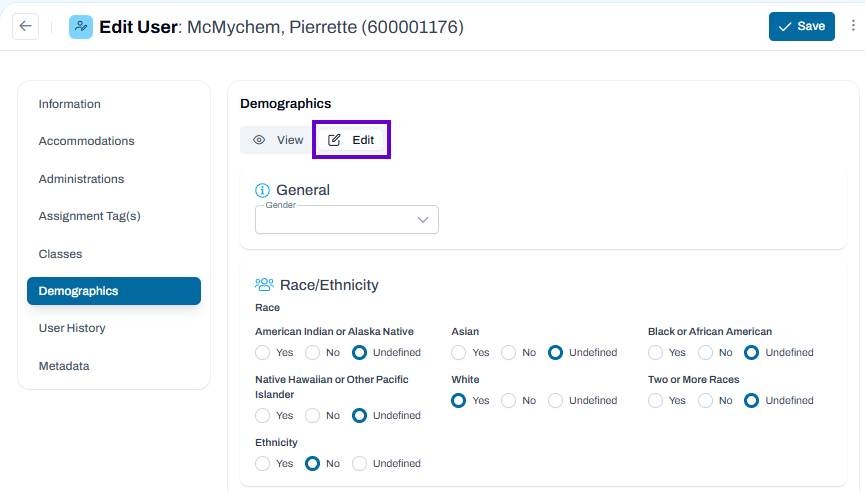
Understanding Field Values
- Yes and No indicate whether a classification or program applies to the user.
- Undefined indicates that a value has not been entered or assigned for that field.
- Some fields may be read-only depending on your permissions or system configuration.
Best Practices
- Ensure demographic information is accurate and up to date before testing and reporting periods.
- Review demographic records regularly to verify program participation and classification data.
- Follow local policies and data privacy requirements when viewing or updating demographic information.
User History
The History tab shows an audit history of who made an update and when to the user record. Click a change entry to see a 'Before and After' view of the changes for that entry. This includes changes to a student's record completed with an accommodation upload. This additional logging will aid in investigating student changes made when district / school users upload accommodations to ADAM.
Classic User Interface:
Updated User Interface:
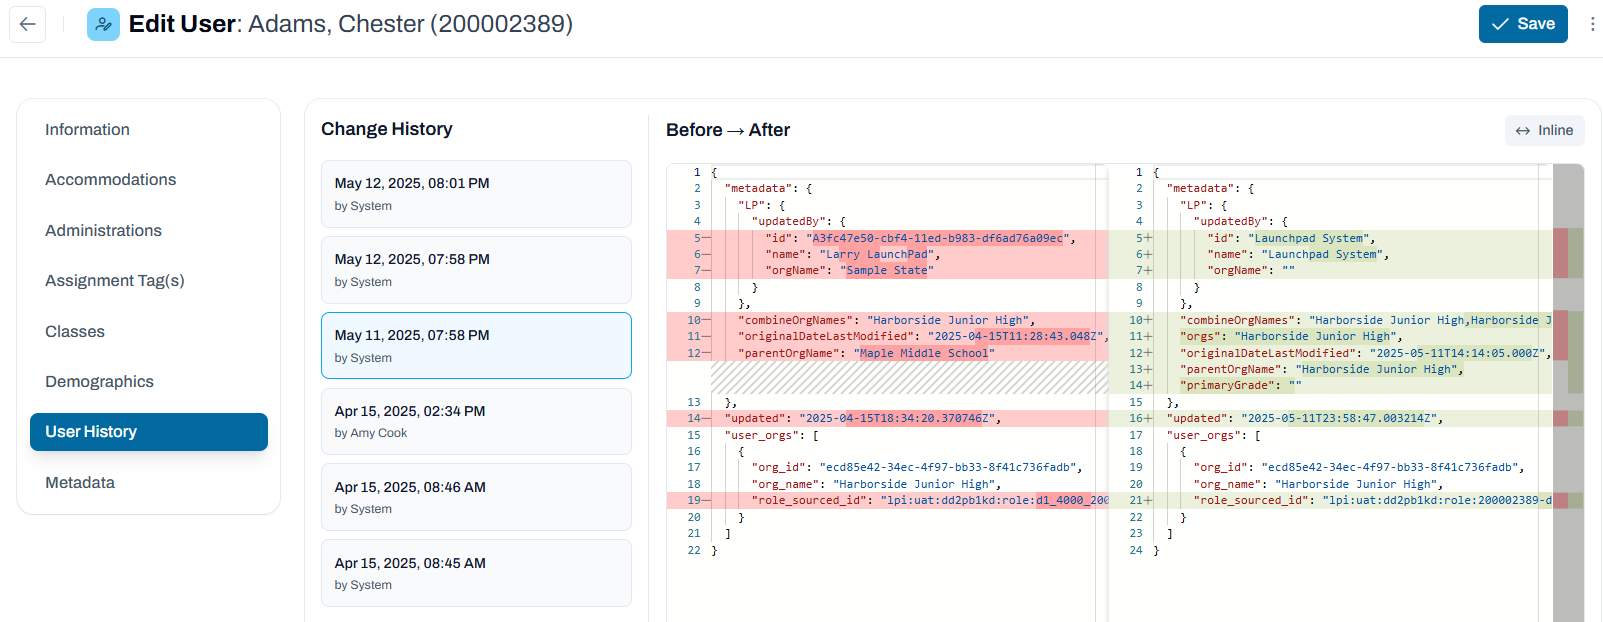
View User History
- Navigate to Users and select the desired user.
- Open the User History section from the navigation menu.
- Review the list of recorded changes displayed on the left side of the page.
- Each history entry includes the date, time, and user who made the change.
Review Change Details
- Select a history entry to view its details.
- The Before → After comparison displays the previous values alongside the updated values.
- Review highlighted differences to identify exactly what was added, removed, or modified.
- Use the comparison view to track updates to user settings, accommodations, demographics, assignments, or other profile information.
Inline Comparison View
- The Inline option displays changes together in a single comparison view.
- Added, removed, or modified values are highlighted to make changes easier to identify.
Best Practices
- Review user history when troubleshooting unexpected changes.
- Use the audit trail to verify when updates were made and by whom.
- Periodically review change records to support compliance, accountability, and data accuracy efforts.
Metadata
Users with the appropriate role permissions can view and edit user metadata fields. The data for these fields is typically provided by LaunchPad or manually uploaded from User Config.
These fields are custom fields (not standard ADAM fields) that are defined in Client Settings.
Parents/Guardians (Classic Interface Only)
The Parent/Guardians tab shows the student's parent/guardian information (first name, last name, and email), if provided in the roster file. Click Unlink to remove a guardian.
This tab appears only for student records (for users with the appropriate permissions).